
If you’re a chocolate and cookie lover, this Oreo Cream Chocolate Roll will be your new favorite dessert. It’s a rich, soft chocolate sponge cake filled with a fluffy Oreo cream filling and rolled into a beautiful swirl. Every slice looks like a showstopper and tastes like heaven — creamy, chocolatey, and perfectly sweet. I once made this with dark cocoa powder and crushed mint Oreos for a refreshing twist, and it was absolutely divine. Whether for birthdays, holidays, or when you just need a dessert that wows, this roll is the ultimate treat.
Why You’ll Love This Recipe
You’ll love this recipe for its perfect combination of rich chocolate and creamy cookies-and-cream filling. The cake itself is light and airy, while the filling is smooth and luscious with bits of crushed Oreo for texture. It looks elegant but is surprisingly easy to make with simple pantry ingredients. Plus, it’s versatile — you can use different Oreo flavors, add melted chocolate drizzle, or top it with whipped cream for extra indulgence. It’s the kind of dessert that always earns compliments.
Print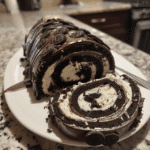
Oreo Cream Chocolate Roll: A Decadent Dessert Dream
- Total Time: 1 hour 30 minutes (including cooling time)
- Yield: 10 slices
- Diet: Vegetarian
Description
Oreo Cream Chocolate Roll is a rich and indulgent dessert made with a soft chocolate sponge cake rolled around a fluffy Oreo cream filling. Perfect for special occasions or to satisfy your chocolate cravings, this dessert combines the best of cake and cookies-and-cream flavors.
Ingredients
- 4 large eggs
- 3/4 cup granulated sugar
- 1 tsp vanilla extract
- 1/4 cup vegetable oil
- 1/4 cup milk
- 1/2 cup all-purpose flour
- 1/4 cup unsweetened cocoa powder
- 1 tsp baking powder
- 1/4 tsp salt
- Filling:
- 1 1/4 cups heavy whipping cream
- 1/4 cup powdered sugar
- 1 tsp vanilla extract
- 8 Oreo cookies, finely crushed
- Decoration (optional): melted chocolate, crushed Oreos, or whipped cream
Instructions
- Preheat the oven to 350°F (175°C). Line a 10×15-inch jelly roll pan with parchment paper and lightly grease it.
- In a mixing bowl, beat eggs and sugar together for about 3–4 minutes, until pale and fluffy.
- Add vanilla extract, vegetable oil, and milk, and whisk until smooth.
- Sift in flour, cocoa powder, baking powder, and salt. Fold gently until fully combined and smooth.
- Pour the batter evenly into the prepared pan and spread with a spatula.
- Bake for 10–12 minutes, or until the cake springs back when lightly touched.
- While warm, carefully invert the cake onto a clean kitchen towel dusted with cocoa powder. Peel off the parchment paper and gently roll the cake up with the towel inside. Let it cool completely.
- For the filling: Beat heavy cream, powdered sugar, and vanilla until stiff peaks form. Fold in the crushed Oreos.
- Once the cake is cool, unroll it carefully and spread the Oreo cream evenly over the surface.
- Roll it back up tightly (without the towel) and wrap it in plastic wrap. Chill for at least 1 hour before serving.
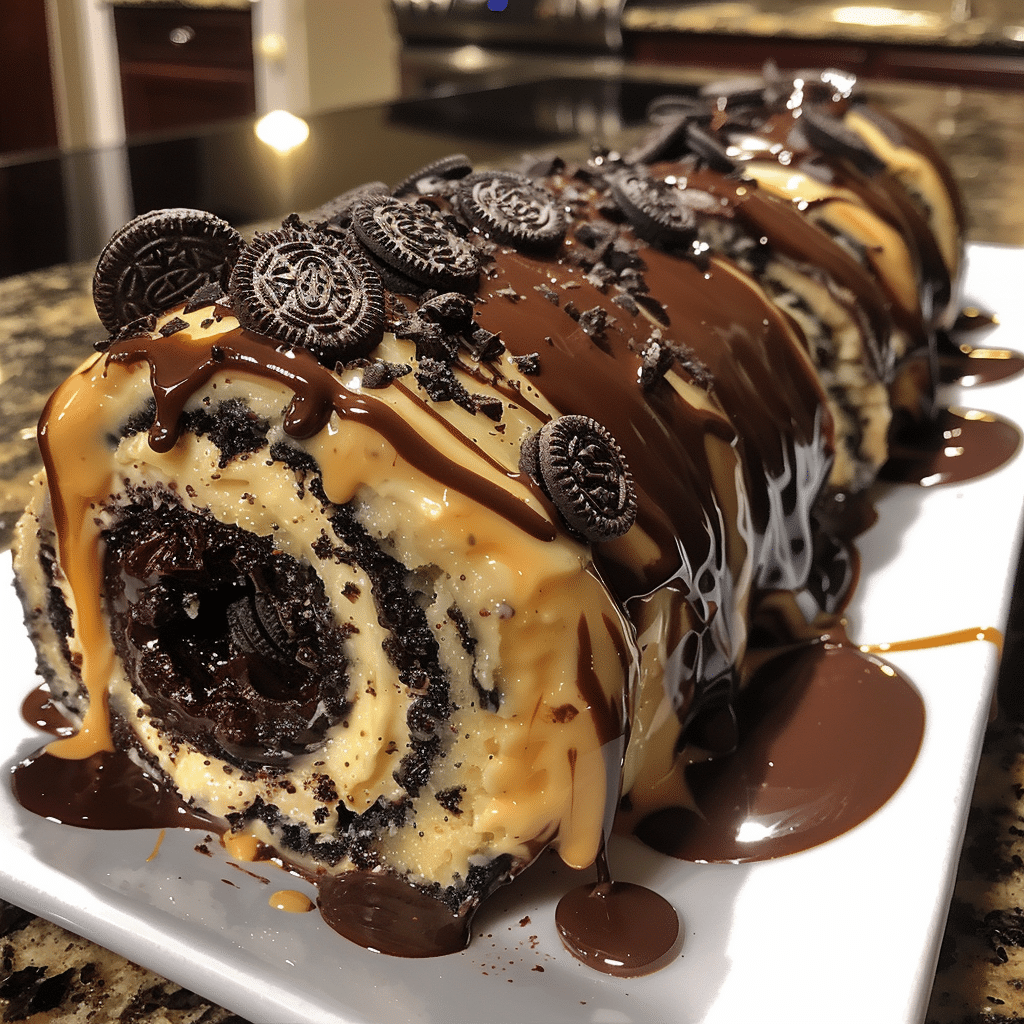
- Optional: Drizzle with melted chocolate and top with crushed Oreos before slicing.
Notes
- Use high-quality cocoa powder for a richer chocolate flavor.
- Don’t overbake the sponge or it will crack when rolled.
- Refrigerate the roll before slicing for clean cuts.
- Can be frozen for up to 2 weeks — just thaw in the fridge overnight before serving.
- Prep Time: 20 minutes
- Cook Time: 12 minutes
- Category: Dessert
- Method: Baking and Rolling
- Cuisine: American
Ingredients
(Tip: You can find the complete list of ingredients and their measurements in the recipe card below.)
All-Purpose Flour – The base of the cake, providing structure while keeping it light.
Unsweetened Cocoa Powder – Adds deep chocolate flavor. Use Dutch-processed cocoa for a richer color.
Eggs – Provide lift and structure to the sponge cake, helping it stay soft and flexible.
Sugar – Sweetens the batter and keeps the cake moist.
Vegetable Oil – Ensures the cake stays tender even after chilling.
Milk – Adds moisture and creates a smooth, pourable batter.
Baking Powder – Helps the cake rise and remain fluffy.
Salt – Balances the sweetness and enhances the chocolate flavor.
Vanilla Extract – Adds warmth and depth to both the cake and cream filling.
Heavy Cream – Whipped into soft peaks for the fluffy Oreo cream filling.
Cream Cheese – Adds tang and stability to the filling, creating a creamy texture.
Powdered Sugar – Sweetens the filling without making it grainy.
Crushed Oreo Cookies – The star of the filling, adding crunch and that unmistakable cookies-and-cream flavor.
Directions
Preheat your oven to 350°F (175°C). Line a 10×15-inch jelly roll pan with parchment paper and lightly grease it. In a large bowl, beat the eggs and sugar until light and fluffy. Add the oil, milk, and vanilla extract, then mix until combined. Sift in the flour, cocoa powder, baking powder, and salt. Gently fold until smooth and lump-free.
Pour the batter into the prepared pan, spreading it evenly. Bake for 10–12 minutes, or until the top springs back when touched. While still warm, turn the cake out onto a clean towel dusted with cocoa powder. Peel off the parchment paper and roll the cake gently (with the towel inside) from the short end. Let it cool completely in this rolled shape to prevent cracking.
Meanwhile, prepare the filling. In a bowl, beat cream cheese and powdered sugar until smooth. Add the heavy cream and vanilla, then whip until fluffy and thick. Fold in crushed Oreos gently.
Once the cake is cooled, carefully unroll it and spread the Oreo cream filling evenly over the surface. Re-roll the cake tightly without the towel. Wrap in plastic wrap and refrigerate for at least 1 hour to set.
To serve, dust with powdered sugar, drizzle with melted chocolate, or decorate with whipped cream and extra Oreo crumbs. Slice and enjoy your perfectly swirled masterpiece.
Equipment needed :
Must-Have Tools to Get Rolling
Here’s what you’ll want to have on hand:
Silicone Spatula – Durable, heat-resistant silicone spatula perfect for mixing, scraping, and spreading. Gentle on non-stick cookware and easy to clean.
Large pot – You’ll need this to boil the whole cabbage head and soften the leaves.
large bowl –Spacious, durable large bowl ideal for mixing, serving, or food preparation. Made from sturdy material and easy to clean.
Sharp knife – For coring the cabbage and slicing out the thick stem in each leaf. A paring knife works best.
Mixing bowl – A big bowl makes it easier to combine your meat and rice filling evenly.
Cutting board – For prepping cabbage leaves and rolling them like a pro.
9×13-inch baking dish – Ideal size to fit your rolled cabbage leaves snugly and prevent them from unraveling.
knife – A sharp, durable kitchen knife perfect for slicing, chopping, and dicing with ease.
Servings and timing
This recipe makes about 8–10 slices and takes around 1 hour total — 20 minutes of prep, 10 minutes to bake, and about 30 minutes to chill. Perfect for parties, potlucks, or as a make-ahead dessert.
Storage/reheating
Store the roll in an airtight container in the refrigerator for up to 4 days. To freeze, wrap tightly in plastic wrap and then foil; it will keep for up to 2 months. Thaw overnight in the fridge before serving. Do not reheat, as it’s meant to be served chilled.
Variations and Customizations
Mint Oreo Roll: Use mint-flavored Oreos for a cool, refreshing twist.
Double Chocolate Roll: Add melted chocolate to the filling for extra richness.
Peanut Butter Oreo Roll: Mix in a few spoonfuls of peanut butter with the cream filling.
Red Velvet Oreo Roll: Replace some cocoa with red food coloring and use golden Oreos in the filling.
Nutty Crunch: Sprinkle chopped hazelnuts or almonds in the filling for added texture.
Mocha Oreo Roll: Add a teaspoon of espresso powder to the batter for a coffee-chocolate flavor combo.
White Chocolate Drizzle: Top with melted white chocolate for an elegant finish.
Holiday Roll: Decorate with crushed peppermint candies and a dusting of powdered sugar for a festive touch.
No-Cream-Cheese Version: Use only whipped cream and Oreos for a lighter, fluffier filling.
Birthday Roll: Add colorful sprinkles inside the filling for a fun, celebratory twist.
FAQs
How do I prevent the cake from cracking?
Roll it while it’s still warm to keep it flexible and easy to shape.
Can I make the filling without cream cheese?
Yes, substitute with mascarpone or whipped topping for a lighter filling.
Can I use different cookies?
Yes, try chocolate chip, Biscoff, or golden Oreos for variety.
How do I get a clean swirl when slicing?
Chill the roll before slicing and use a sharp knife wiped clean between cuts.
Can I make this ahead of time?
Yes, it tastes even better the next day after the flavors meld together.
What’s the best way to crush Oreos?
Use a food processor or seal them in a bag and crush with a rolling pin.
Can I freeze it?
Absolutely — just wrap tightly to prevent freezer burn and thaw overnight before serving.
Can I use boxed cake mix?
Yes, a chocolate sponge mix works great for an easier version.
Can I add frosting on top?
Yes, a drizzle of chocolate ganache or whipped cream frosting makes it even more indulgent.
How long does it last in the fridge?
It stays fresh for up to 4 days when stored in an airtight container.
Conclusion
Oreo Cream Chocolate Roll is the perfect dessert for anyone who loves the blend of rich chocolate and creamy cookies-and-cream flavor. With its soft sponge, smooth filling, and stunning presentation, it’s a dessert that feels both nostalgic and elegant. Easy to make yet impressive to serve, it’s ideal for any celebration or sweet craving. Each bite delivers that perfect balance of chocolatey goodness and creamy decadence — the kind of treat that makes every occasion feel special.
Hungry for more? Visit our website for full recipes and follow us on Pinterest for daily foodie inspo you’ll love to pin!